How to Remove a Credit Card from Your Apple ID
Contents
If you’re an iPhone user, you probably know that your Apple ID is linked to your credit card. This can be convenient for making purchases, but it can also be a security risk. In this blog post, we’ll show you how to remove a credit card from your Apple ID. This way, you can still make purchases, but your credit card information will be more secure.
Checkout this video:

Log in to your Apple ID account page.
Log in to your Apple ID account page.
Click Edit in the Account section.
Click on the – sign next to the credit card that you want to remove.
A message asks if you’re sure that you want to remove the credit card information from your account. Click Remove.
You might need to enter the security code that’s printed on your credit or debit card.
Scroll to the “Security” section and click “Edit.”
You can remove a credit card from your Apple ID in a few different ways. The easiest way is to do it right on your iPhone, but you can also do it from iTunes on your computer, or through the Apple ID website.
Here’s how to remove a credit card from your Apple ID on your iPhone:
1. Open the Settings app and tap on your name at the top.
2. Tap “Payment & Shipping.”
3. Scroll down to the “Security” section and click “Edit.”
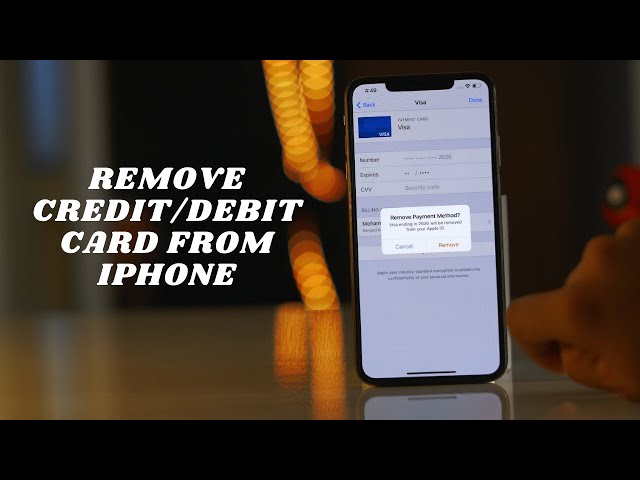
4. Click the minus sign next to the credit card you want to remove and then click “Done.”
Click the “X” next to the credit card you want to remove.
If you want to remove a credit card from your Apple ID, you can do so in a few clicks on your iPhone, iPad, or Mac.
On an iPhone or iPad:
Open the Settings app.
Tap on your name.
Tap on “Billing & Shipping.”
Under “Payment Methods,” tap on the credit card you want to remove.
Tap “Remove Credit Card.”
On a Mac:
Open the App Store.
Click on your account name in the lower-left corner of the screen.
Click “View Information.”
In the section labeled “Payment Method,” click on the credit card you want to remove.
Click “Remove Credit Card.”
Click “Done.”
Once you have updated your payment information, you will need to click “Done” in order to save your changes.